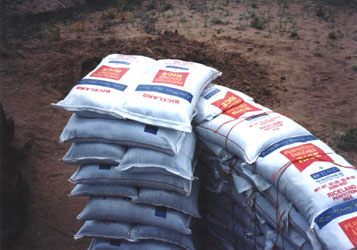
Below is a step-by-step description of how our first experimental earthbag dome was created. We called this dome "Riceland," after the brand name printed on the polypropylene rice bags that were used to build it. The interior diameter is 14 feet (4.3 meters).
This prototype dome could serve as a model for emergency shelters, cabins, studios, garden sheds, etc. It should work well in earthquake-prone areas and places subject to flooding, winds, and hurricanes. It could be used as quick housing for people made homeless by natural disasters, such as in Pakistan, Turkey, Iran, Indonesia, India, Sri Lanka, and El Salvador.
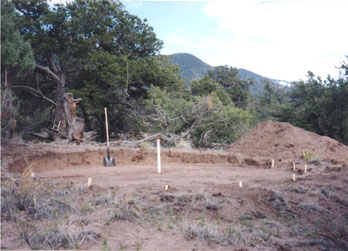
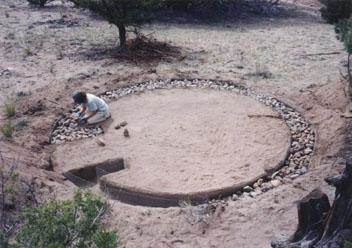
Level the Site
First you want to select a building site for the dome that is well-drained, where water will not tend to collect. Then you can mark the very center of where the dome will stand with a stake that will remain there until the dome is near completion. Using a string or rope attached to this stake as a radius (in this case 7 feet plus an extra 2 feet...or 9 feet...just under 3 meters), mark the perimeter to be leveled. Using a shovel and a level, clear the area of debris and get the circular area more or less level.
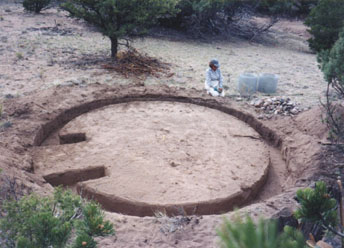
Dig the Perimeter Trench
In areas where heavier soils might not drain well, it is important to create a rubble trench foundation for the dome. This helps keep moisture from wicking up into the bag wall, as well as keeps the wall from "heaving" if the ground freezes. Using the same center stake, mark the interior circle of the wall and also the exterior circle (this depends on how wide your bags are.) Also mark where the entrance will be located, allowing enough space for a door and its wooden or steel frame. Note that this entrance footing jogs inward to support the vertical door once the dome slopes inward.
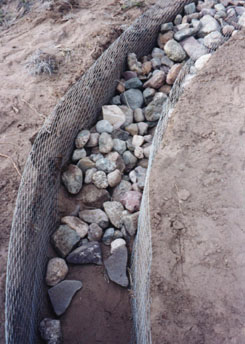
Fill the Trench with Cobbles
Gather, or have delivered, the rubble to fill the trench with. This can be small stones, gravel, or "urbanite" (broken up concrete debris). You will notice that this trench was lined with a wire mesh. I did this because our soil is a loose sand that would easily cave in and fill the voids of the rubble, but this is likely not necessary with most soils.
How High to Fill the Trench?
This depends on whether you want to recess the first row (or rows) of bags into the trench or not. We laid the first row of bags at ground level. In situations where flooding or earthquakes might occur, it may be advantageous to recess the bags into the ground, so that even if the soil surrounding the dome is undermined, the dome itself would likely not be affected.
What Kind of Bag to Use?
We used standard 50 pound misprinted polypropylene rice bags, which can be purchased in bales of 1,000 each. If you are going to fill the bags with loose material, it is pretty much imperative to use the poly bags, because they are stronger and will not deteriorate once they are plastered. If you intend to fill the bags with an adobe or stabilized material, then burlap or other natural materials for the bags may work, because once the wall has set up, the strength of the bag is not so important. The 50 pound size of bag is about right for most applications; the wall will be about 15 inches (38 cm) thick when plastered. If you have larger bags, they might be used at the base, and if you have smaller bags, they might work near the top of the dome. It is also possible to use poly tubing that can be purchased in great rolls, but I prefer the individual bags for several reasons: 1) the bags are cheaper 2) one person can do the work 3) each bag is quite light...about 35 pounds (16 kg) when filled with scoria, and 4) with the seam at the base of the bag, it tends to stay where it is put, whereas the tubing has a tendency to roll, especially when filled with loose material.
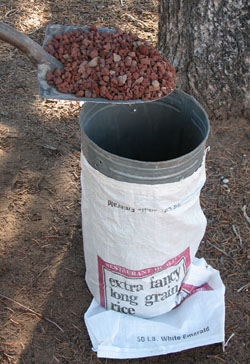
Filling the Bags
Now the bags can be filled with whatever material you decide to use for this. We used a locally mined, crushed volcanic rock (called scoria) because it is lightweight and highly insulating. You might be able to use the local soil from your site, especially if you live where the climate is fairly moderate, or if you don't intend to inhabit the structure. I say this because just soil alone doesn't provide insulation. Other possible insulating materials include rice hulls or perlite. Note that the rice bag is being held open with a large steel funnel (part of a chicken feeder). Leave about 8 to10 inches (20-25 cm) of space at the top of the bag to allow this to be folded over when the bag is placed on the wall to seal the contents in. We used two bags (one placed inside another) on the first course to help protect the bags from rupture on any sharp rocks.
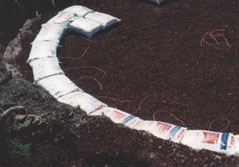
Laying the Bags
Using the trench as guide, place the first row of bags down over the rubble in a neat row. It is important to carefully place each bag so that the folded-over flap at the top lays snugly against the bottom of the previously laid bag, so that each bag gets completely sealed. Also, note that before each bag is placed, a piece of polypropylene twine (about 5 feet long...1.5 meters) can be put below it to eventually tie around two courses above the bag.
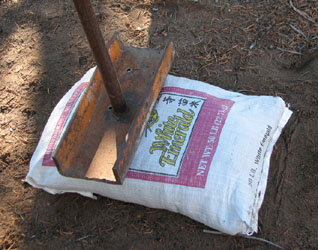
Tamping the Bags
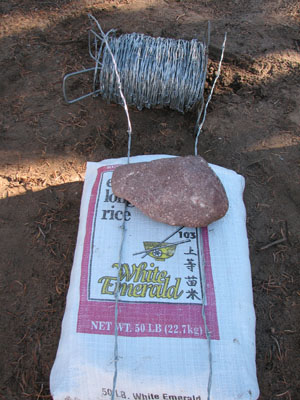
Once a course of bags is placed, it should be thoroughly tamped to make the fill material as compact as possible, so that the dome walls don't settle much as the wall proceeds. I used a variety of methods and tools for doing this, from simply stomping on the bags with my shoes to using homemade tampers. My favorite tamper is pictured here. It is quite heavy, which means that even though it takes work to lift it, you don't have to put as much muscle into the down-stroke. Also, the base of this tamper is about as wide as the bag is, so one tamp will cover the entire width of the bag.
Placing barbed wire
As the courses proceed, the other important element is that two strands of 4-point barbed wire should be spaced about 4 inches (10 cm) in from each side of the bags. This can be weighted into place with bricks or stones until covered with the next course of bags. The barbed wire has two functions: 1) it helps lock the bags together and 2) it helps resist any tendency for the wall to expand outward with the weight from above. This wire should be placed between every course as the wall goes up.
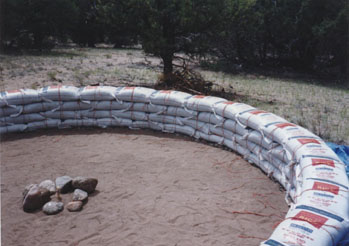
Adding more Courses
The first several courses will be placed pretty much vertically, above each other. The bags should overlap in a brick-like pattern (running bond) as the wall goes up. This makes for stronger bonding of the wall. You can see that the poly twine from two courses below the top course has been tied at the top to also create a more integrated wall and to give the eventual plaster something positive to grip onto.
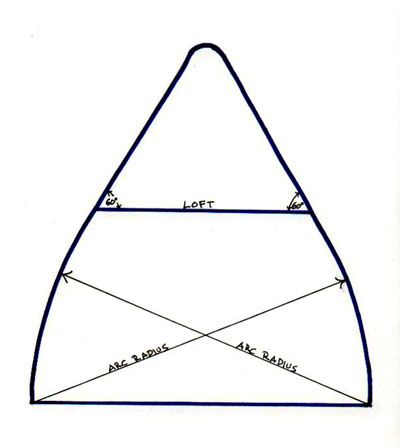
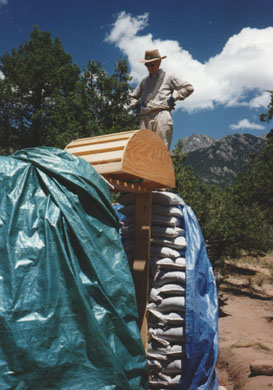
Measuring Where to Place the Bags
A simple way to create a stable shape for the dome is to use a pole that is exactly the length of the interior diameter (14 feet, 4.3 meters in this case) as a guide. If you place the pole at the bottom of the perimeter and then pass it through the vertical line marking the very center of the dome, the end of this pole will describe an appropriate arc for the shape of the dome. This works up to loft level (about 8 feet 2.5 meters high), and then the upper part of the dome is best kept as an actual cone shape, using a 30/60 degree right triangle as a guide. A simple tripod guide can be erected above loft level to help place the bags. Doing this assures that none of the bags are corbelled inward too abruptly, and also gives the loft more head room.
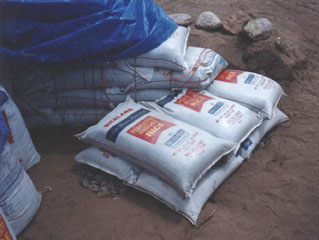
Entrance Columns
In order to stabilize the entrance to the dome, it is necessary to create massive columns that will help hold the shape that you want and support the arch over the doorway. I came up with a double-bag arrangement as shown at right. In order to do this, I needed to completely fill the bags to the top and then sew or staple a secure hem that would contain the contents of the bag, even when tamped. The length of these very full bags would then match the width of two bags laid side-by-side. You can also see how the column bags are locked into the dome wall bags.
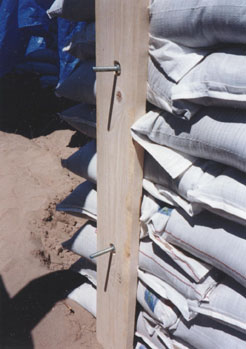
Door Frame Anchor
This is one method of anchoring the door frame to the bag column, by placing a piece of threaded rod between the bags, with chunk of wood fastened with a washer and nut at one end of it. Then the door frame can be attached to the other end and tightened against the column. Other approaches to this are to simply drive a longer piece of threaded rod all the way through the column and fastening it in a similar way...or to put a piece of plywood with lots of nails poking through it and a heftier chunk of wood attached so that this offers something to anchor the frame to later.

Merging Column and Wall
As the column and the wall grow taller, and the wall slants inward with its natural curve, the two elements will eventually blend into a simple shape. If you look at the picture above and then at this one, you can see that the column gets shallower as it rises.( The picture above is of the one side of a doorway and this picture is of the other side.) The height pictured here is about where the arch form will be placed to begin the arch over the door.
Attaching the Door Frame
This detail shows how the wooden door frame is bolted to the bag column by recessing the nuts so that they will not interfere with installing the door. Once the frame is cinched up tightly, the excess threaded rod can be sawed off.
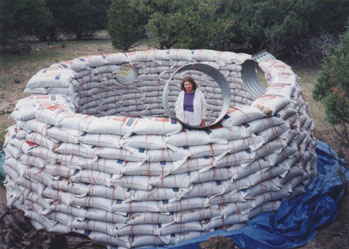
Window Frames
We used standard culvert couplers as window supports in Riceland. These are inexpensive and come in a variety of sizes, as shown. It is easy to set the couplers wherever you want, and just stack the bags around them. It may be necessary to brace them into place until they get locked in with the bags, but once this happens they become quite firm. They should be slanted to match the curve of the wall. Notice the blue tarp at the base of the bag wall; it is used to protect the bags from ultraviolet exposure of the sun when not working on the project. It's important to keep the bags covered because the sun does degrade them. So do be sure to put a finish stucco on when you are done.
Door Frame
This simple 2X6 inch (4X15 cm) door frame will accommodate a wooden door, or a steel door could be attached to it. The header across the top is a bit skimpy...a 4X6 inch (10X15 cm) piece would be better. A heftier header made of logs could support the bags above it without creating an arch form, if this is desired.
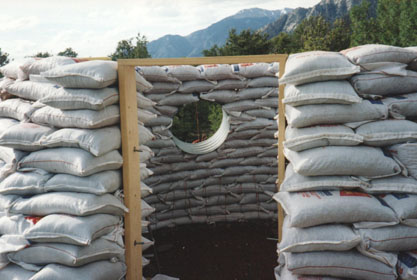
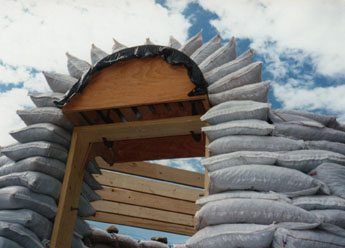
The Arch Form
The form for the arch pictured here was made with two pieces of plywood cut to the right shape, and then 2X4's (4X10 cm's) (about the length of completely filled bags) were nailed at intervals between the plywood. This form was then set on top of the door frame. If some shims fit between the form and what it rests on, then these can be easily removed when the time comes to release the form. The form can be used over and over for any arch of this size. Note that the bag wall is covered with tarps to keep the sun off of them.
Placing the Bags Over the Form
Completely full bags that have been securely hemmed at the top are used to make the arch. The bags are placed in such a way that they radiate outward, and should be tamped into place. Proceed by placing the bags symmetrically on either side of the form. When you get to the top, it is a bit tricky to get the last few bags into place; it may require some persuasion with a piece of plywood or something to get them to slip into place. Do not remove the form until the wall of the dome has completely covered it, or else you run the risk of the arch splaying out and collapsing.
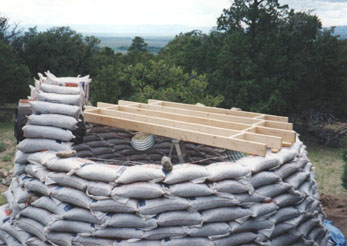
The Loft Joists
Once you arrive at the level where you want the loft to be, the joists for this can be placed right on the bag wall and shimmed to be perfectly level. You can see that these are also kept evenly spaced and vertical with blocking nailed between them. I used 2X8 inch (4X20 cm) joists for this loft, but small logs could also have been used. With logs, they can be pre-drilled and pinned to the bag wall with pieces of 1/2 inch (1.3 cm) steel.
Completing the Top of the Dome
As you close in at the top of the dome, it becomes more necessary to angle the folded end of the bag to adapt to the increasingly tight angle of the circular course. This is fairly easily done just by arranging the contents of the bag to make that angled shape. While working on the conical top of the dome, one can actually climb around on the outside like you would on a small mountain. Notice that I have kept the bottom part of the dome tarped to keep off the sunlight, since it isn't plastered yet.

The Final Bags!
This view is looking up at the top of the completed dome from inside. If you want to place an air vent here (which is a good idea), then those last few bags can be moved over a bit to make room for it. I used 6 to 8 inch (15 to 20 cm) PVC pipe for this purpose, and then eventually use a tether ball for a vent closure.

Releasing the Arch Form
Once the bags are stacked over the arch, then the form can be released. As mentioned earlier, it helps to have the form shimmed into place so that the shims can be easily knocked out to drop the form down and be able to pull it out.

Look Ma, No Form!
It is always amazingly pleasing to release the form and see the arch standing all by itself.

Applying Plaster
Finally the time has come to put plaster over the earthbags. This could be done to some extent as you go along, but in many ways it is easier to wait until all of the bag work is done, and do the plastering as final step. We chose to experiment with papercrete (re-pulped paper mixed with Portland cement and sand) as a plaster, and this has worked out well, at least in our rather arid climate. The papercrete adds to the insulation value of the wall. Other possible plaster materials for the outside of the dome are common cement stucco and stabilized earthen plasters. While the papercrete absorbs moisture like a sponge, the dampness never migrates to the inside of the dome. Other plasters may require that a moisture barrier (such as polyethylene sheeting) be draped over the dome before applying the plaster, and then using a stucco netting to reinforce the plaster.

Working around the Windows
Here I am plastering around one of the round windows, getting ready to actually install the glass. Above the window you can see the ends of the joists sticking through the bag wall, flush with the outside. These wooden parts will be plastered over along with all of the bags. In some cases, I put a wood preservative or sealing coat over the ends of the wood, just to make sure that they don't absorb too much moisture and tend to rot over time.

Fitting the Glass
While the plaster is still wet, I placed the glass I intended to use for the window over the opening and scored around the perimeter of it with a trowel edge to indicate where the glass will need to fit. The glass I used was obtained at glass shops as seconds or glass that they wanted to sell cheaply because it was cut wrong or nobody picked it up. Most of this was "thermalpane" (two layers of glass) for better insulation. In some cases the seal between the panes allowed moisture to enter the glass, but mostly these have held up OK.

Preparing the Plaster to Accept the Glass
Using the score line, I remove enough of the wet plaster to be able to recess the glass into this cavity. It may take several times of placing the glass there to make sure of a good fit. Once you are satisfied that the glass will fit, you can let the plaster set up before actually installing the glass; this will give the glass a firm base to sit on. With Riceland, I did two applications of plaster, so that when I did the second coat, I overlapped the glass with the new plaster on the top and on the two sides. The bottom was left flush with the original coat so that water would run off...sort of like shingles are set.

Finishing the First Plaster Coat
Plastering is an activity where help is always welcome. It doesn't take much experience to be able to do it, and it can be a fun social affair.

Vents and Completed Window
Here you can see the air vent at the top, complete with its bonnet to keep rain from entering. This can also be screened to keep insects from coming in. A stainless steel insulated wood stove vent is below the top vent. Also you can see how the final coat of plaster overlaps the window to shed water. Inlet air vents can be arranged strategically at lower levels...this should be done while the building is in progress.

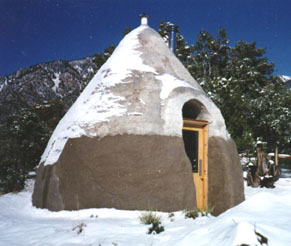
Completed Dome!
We started building Riceland during the summer, and by the time the snow was flying it was snug and cozy inside.
Adding Color
A final color coat can be applied, either by using conventional cement stucco methods, or by painting the plaster. I used a pigmented lime wash stabalized with latex on the papercrete at the left.

Δεν υπάρχουν σχόλια:
Δημοσίευση σχολίου